Publisher Example
Please follow the instructions in Setup and run UE Project to set up the UE project and open ROS2TopicExample.umap.
C++ Publisher
Code
//ROS2PublisherNode.h

UCLASS()
class TURTLEBOT3_API AROS2PublisherNode : public AActor
{
    GENERATED_BODY()

public:
    AROS2PublisherNode();

    virtual void BeginPlay() override;

    UFUNCTION()
    void UpdateMessage(UROS2GenericMsg* InMessage);

    UPROPERTY(EditAnywhere, BlueprintReadWrite)
    UROS2NodeComponent* Node = nullptr;

    UPROPERTY(EditAnywhere, BlueprintReadWrite)
    UROS2Publisher* Publisher = nullptr;

    UPROPERTY(EditAnywhere, BlueprintReadWrite)
    UROS2Publisher* LoopPublisher = nullptr;

    UPROPERTY(EditAnywhere, BlueprintReadWrite)
    URRROS2StringPublisher* StringPublisher = nullptr;

    UPROPERTY(EditAnywhere, BlueprintReadWrite)
    FString TopicName = TEXT("test_topic");

    UPROPERTY(EditAnywhere, BlueprintReadWrite)
    float PublicationFrequencyHz = 1.f;

    UPROPERTY(EditAnywhere, BlueprintReadWrite)
    FString Message = TEXT("Hello from C++");

    UPROPERTY()
    int32 Count = 0;
};
//ROS2PublisherNode.cpp

AROS2PublisherNode::AROS2PublisherNode()
{
    Node = CreateDefaultSubobject<UROS2NodeComponent>(TEXT("ROS2NodeComponent"));

    // these parameters can be change from BP
    Node->Name = TEXT("publisher_node");
    Node->Namespace = TEXT("cpp");
}

void AROS2PublisherNode::BeginPlay()
{
    Super::BeginPlay();

    Node->Init();

    // Create publisher with 3 different ways.
    // 1. Non Loop Publisher
    // 2. Loop Publisher
    // 3. Custom Publisher class

    // 1. Non Loop Publisher
    // 1.1 Create publisher
    Publisher = Node->CreatePublisher(TopicName, UROS2Publisher::StaticClass(), UROS2StrMsg::StaticClass(), UROS2QoS::KeepLast);

    // 1.2 Create msg
    FROSStr msg;
    msg.Data = FString::Printf(TEXT("%s from non loop publisher"), *Message);
    CastChecked<UROS2StrMsg>(Publisher->TopicMessage)->SetMsg(msg);

    // 1.3 publish
    Publisher->Publish();

    // 2. Loop Publisher
    ROS2_CREATE_LOOP_PUBLISHER_WITH_QOS(Node,
                                        this,
                                        TopicName,
                                        UROS2Publisher::StaticClass(),
                                        UROS2StrMsg::StaticClass(),
                                        PublicationFrequencyHz,
                                        &AROS2PublisherNode::UpdateMessage,
                                        UROS2QoS::Default,
                                        LoopPublisher);

    // 3. Use Custom Publisher class
    // UpdateMessage is overriden in child class.
    StringPublisher = CastChecked<URRROS2StringPublisher>(
        Node->CreateLoopPublisherWithClass(TopicName, URRROS2StringPublisher::StaticClass(), 1.f));
    StringPublisher->Message = FString::Printf(TEXT("%s from custom class"), *Message);
}

void AROS2PublisherNode::UpdateMessage(UROS2GenericMsg* InMessage)
{
    FROSStr msg;
    msg.Data = FString::Printf(TEXT("%s %d"), *Message, Count++);
    CastChecked<UROS2StrMsg>(InMessage)->SetMsg(msg);
}
Code explanations
In the constructor, the UROS2NodeComponent is created using CreateDefaultSubobject and its parameters such as Node Name and Namespace are set.
Although the UROS2NodeComponent is created, the ROS2 Node is not yet initialized at this point. Initialization of the ROS2 Node occurs during the BeginPlay method, which is called when the simulation starts.
One reason to initialize in BeginPlay is to create a ROS2 Node when the simulation starts. It is important to note that the UE Class constructor may also be called before simulation starts, for example, when an Actor is placed in the level. For a better understanding of Actor Lifecycle, please refer to the UE Actor LifeCycle However, understanding the entire lifecycle is not necessary to use rclUE.
Another significant difference is that by initializing in BeginPlay, variables such as publication frequency can be set in the editor and their changes will be reflected when running the simulation. If, in contrast, we initialize things in the constructor, variables changed in the editor would not reflect in the simulation, unless we restart the editor.
AROS2PublisherNode::AROS2PublisherNode()
{
    Node = CreateDefaultSubobject<UROS2NodeComponent>(TEXT("ROS2NodeComponent"));

    // these parameters can be change from BP
    Node->Name = TEXT("publisher_node");
    Node->Namespace = TEXT("cpp");
}
When simulation starts, BeginPlay is called. In the BeginPlay, firstly create and initialize ROS2 Node by calling UROS2NodeComponent::Init .
void AROS2PublisherNode::BeginPlay()
{
    Super::BeginPlay();

    Node->Init();
then starts adding publishers. We introduce 3 ways to add publisher here.
Non Loop Publisher
This will create a publisher and publish a message once. It is a straightforward way to publish a message, involving creating a publisher, creating a message, and publishing the message.
To create a publisher, use UROS2NodeComponent::CreatePublisher
Create a structure (FROSStr) for the contrasting message (UROSStrMsg) and assign characters to the Data field. Then, assign the structure to the message using the SetMsg method.
Finally, call the UROS2Publisher::Publish method to publish the topic.
// 1. Non Loop Publisher
// 1.1 Create publisher
Publisher = Node->CreatePublisher(TopicName, UROS2Publisher::StaticClass(), UROS2StrMsg::StaticClass(), UROS2QoS::KeepLast);

// 1.2 Create msg
FROSStr msg;
msg.Data = FString::Printf(TEXT("%s from non loop publisher"), *Message);
CastChecked<UROS2StrMsg>(Publisher->TopicMessage)->SetMsg(msg);

// 1.3 publish
Publisher->Publish();
Loop Publisher
You can create a loop publisher by using the ROS2_CREATE_LOOP_PUBLISHER_WITH_QOS macro. This macro creates a publisher and adds it to the node, and then it periodically calls the AROS2PublisherNode::UpdateMessage method.
// 2. Loop Publisher
ROS2_CREATE_LOOP_PUBLISHER_WITH_QOS(Node,
                                    this,
                                    TopicName,
                                    UROS2Publisher::StaticClass(),
                                    UROS2StrMsg::StaticClass(),
                                    PublicationFrequencyHz,
                                    &AROS2PublisherNode::UpdateMessage,
                                    UROS2QoS::Default,
                                    LoopPublisher);
UpdateMessage method does similar things as a non-loop publisher. Since the loop publisher automatically calls the “Publish()” method, you only need to create and set the message.
void AROS2PublisherNode::UpdateMessage(UROS2GenericMsg* InMessage)
{
    FROSStr msg;
    msg.Data = FString::Printf(TEXT("%s %d"), *Message, Count++);
    CastChecked<UROS2StrMsg>(InMessage)->SetMsg(msg);
}
The implementation of ROS2_CREATE_LOOP_PUBLISHER_WITH_QOS is as follows. It uses Unreal Engine’s dynamic delegate to call a bound function periodically. You can find more information about Unreal Engine’s dynamic delegate here.
DECLARE_DYNAMIC_DELEGATE_OneParam(FTopicCallback, UROS2GenericMsg*, InTopicMessage);

#define ROS2_CREATE_LOOP_PUBLISHER_WITH_QOS(                                                                                  \
    InROS2Node, InUserObject, InTopicName, InPublisherClass, InMsgClass, InPubFrequency, InCallback, InQoS, OutPublisher)     \
    if (ensure(IsValid(InROS2Node)))                                                                                          \
    {                                                                                                                         \
        FTopicCallback cb;                                                                                                    \
        cb.BindDynamic(InUserObject, InCallback);                                                                             \
        OutPublisher = InROS2Node->CreateLoopPublisher(InTopicName, InPublisherClass, InMsgClass, InPubFrequency, cb, InQoS); \
    }
Custom Publisher class
You can create a publisher by defining a child class of UROS2Publisher. This is useful when you want to add some custom logic to the publisher that will be used in multiple places.
// 3. Use Custom Publisher class
// UpdateMessage is overriden in child class.
StringPublisher = CastChecked<URRROS2StringPublisher>(
    Node->CreateLoopPublisherWithClass(TopicName, URRROS2StringPublisher::StaticClass(), 1.f));
StringPublisher->Message = FString::Printf(TEXT("%s from custom class"), *Message);
The implementation of UROS2StringPublisher is as follows. UROS2StringPublisher is a child class of UROS2Publisher.
The constructor is used to set default publisher settings. You can add user-defined logic by overriding the UpdateMessage method, which is called periodically if PublicationFrequencyHz > 0.
// RRROS2StringPublisher.cpp
#include "Msgs/ROS2Str.h"

URRROS2StringPublisher::URRROS2StringPublisher()
{
    MsgClass = UROS2StrMsg::StaticClass();
    PublicationFrequencyHz = 1;
    QoS = UROS2QoS::DynamicBroadcaster;
    SetDefaultDelegates();    //use UpdateMessage as update delegate
}

void URRROS2StringPublisher::UpdateMessage(UROS2GenericMsg* InMessage)
{
    FROSStr msg;
    msg.Data = Message;
    CastChecked<UROS2StrMsg>(InMessage)->SetMsg(msg);
}
BP Publisher
Blueprint implementation of a publisher is very similar to a C++ implementation. Blueprints allow you to set logic/processes, parameters, and other details from the editor.
You can add component such as UROS2Publisher from Components panel in the editor(left side in the fig below) and set each component parameters in Details panel in the editor(right side in the fig below).
* Please enlarge the image if the font is too small, or open the BP class in the editor.
Overview of BP Publisher
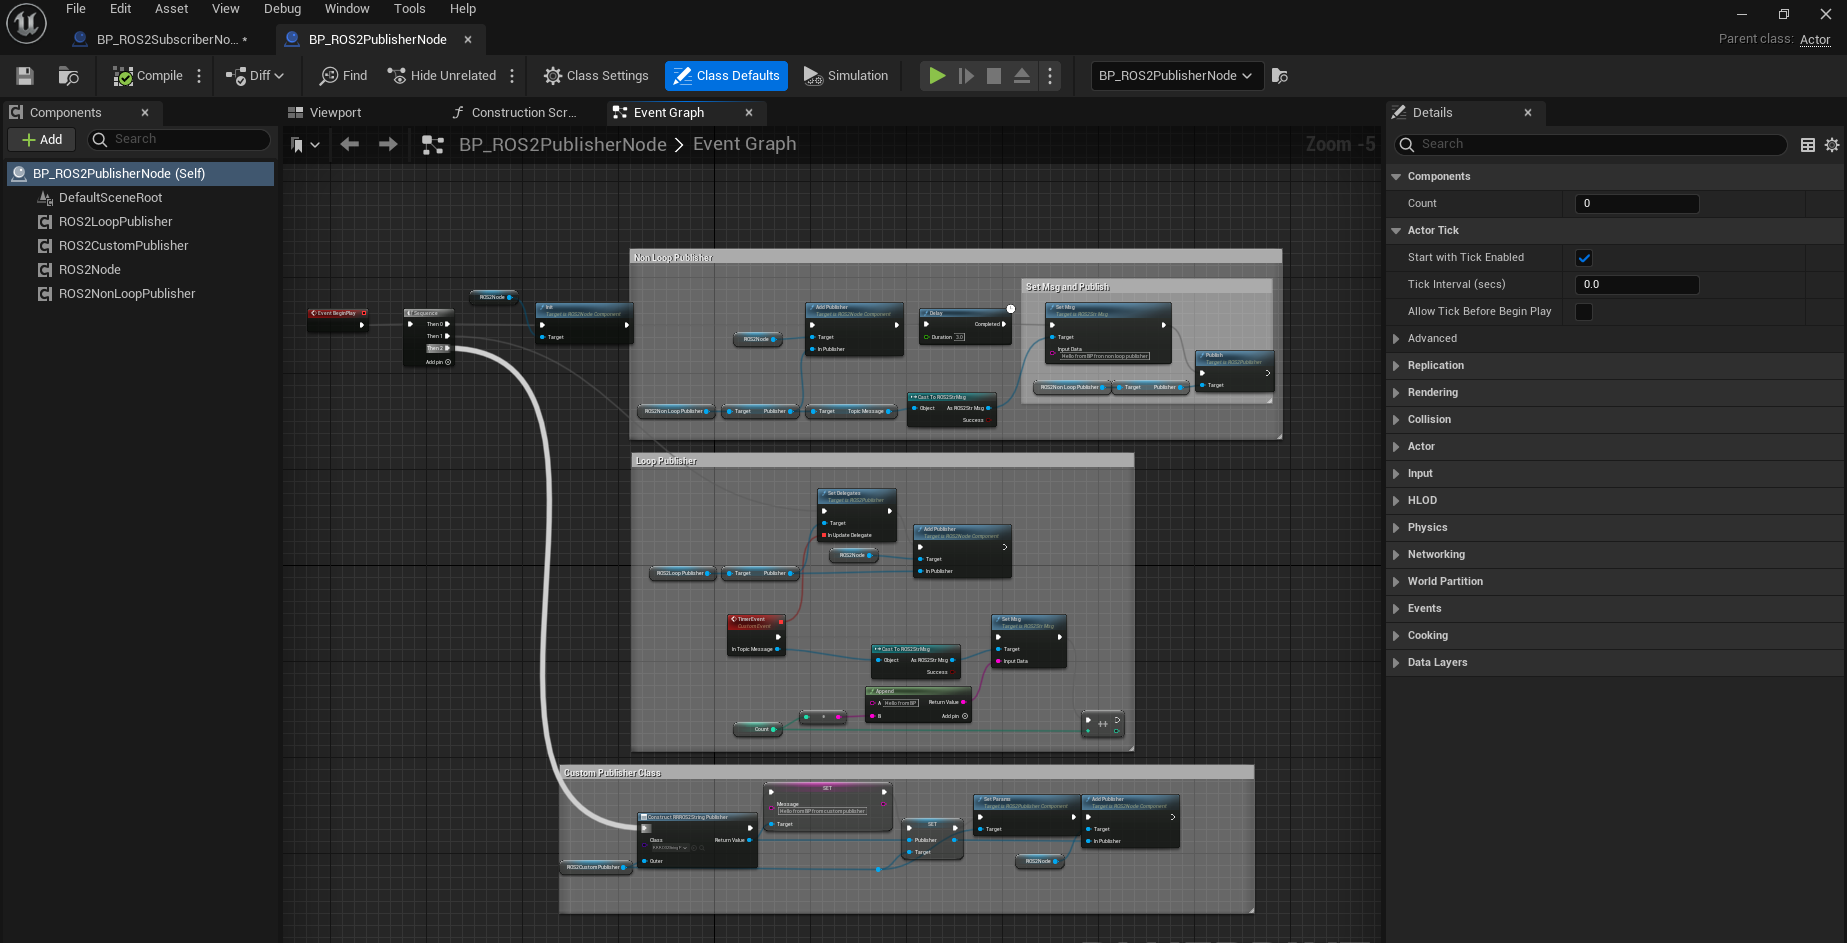
Similar to the C++ implementation, the BP class has three types of publishers: Non-Loop Publisher, Loop Publisher, and Custom Publisher.
The main difference from the C++ implementation is that it uses UROS2PublisherComponent instead of UROS2Publisher. As UROS2PublisherComponent is a child class of UActorComponent and has UROS2Publisher as a member variable, you can easily add it to the Actor and set parameters from the editor.
Each publisher is attached to an Actor, which is displayed in the Components panel on the left.
Details of BP Publisher
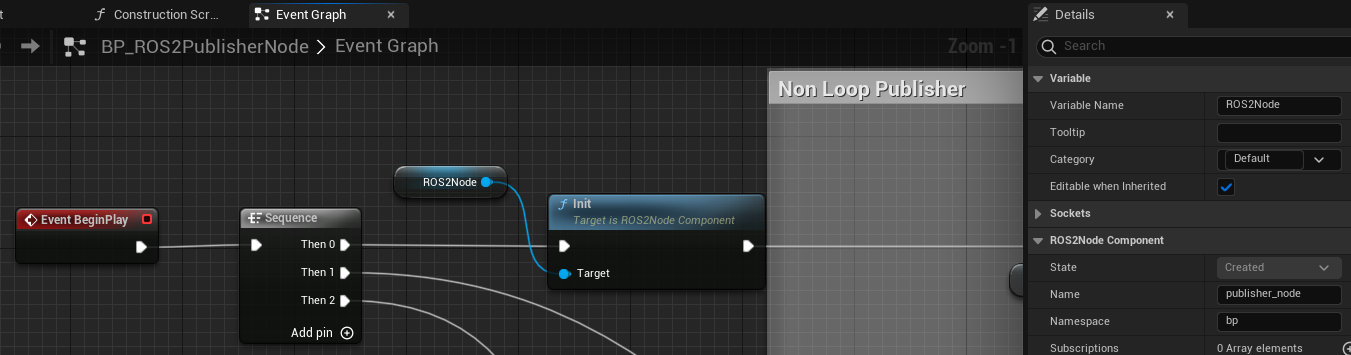
Initialize the ROS2 Node using the BeginPlay event. You can set the ROSNode parameters, such as Name and Namespace, from the Details panel on the right.
Non Loop Publisher

Compared to C++, which uses CreatePublisher(), in Blueprint, the Publisher is already generated as a Component before BeginPlay. Therefore, we use UROS2NodeComponent::AddPublisher to initialize the Publisher instead. The CreatePublisher function in C++ internally calls AddPublisher.
You can see that parameters such as Topic Name, Publisher Class, and Msg Class are set in the right Details panel.
Loop Publisher
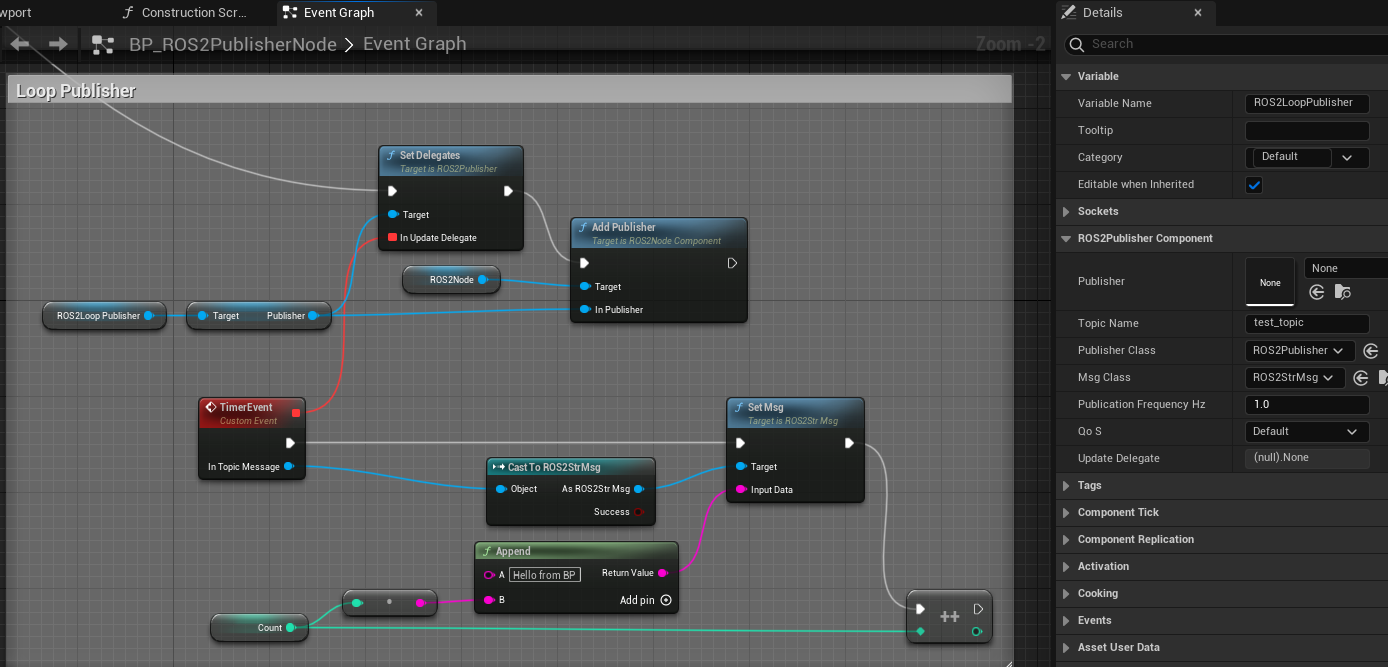
Callback function is bound to a custom event, indicated by the red node in the center. This callback function is executed at regular intervals with a specified frequency.
Custom Publisher class
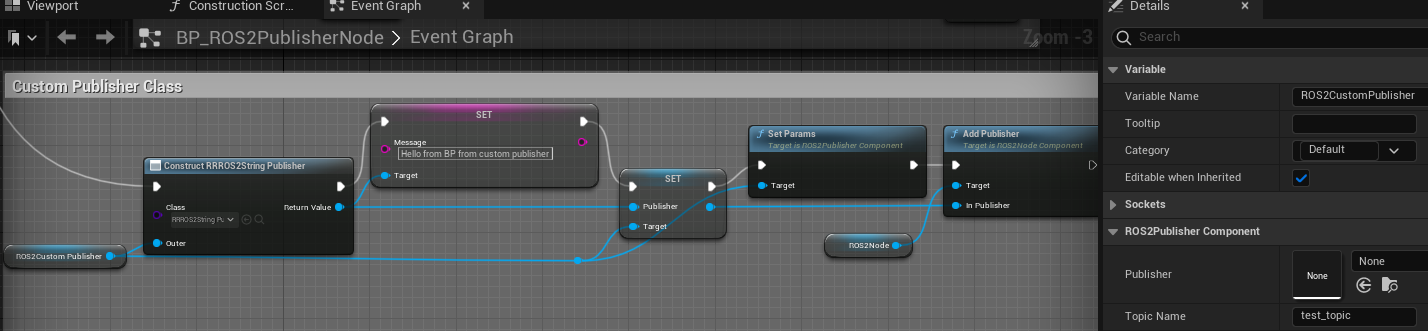
Since custom publisher class is alreay set class, callbak and etc, we just need to add it to the node.